8. Effects
Soundprobe has a large selection of high quality effects
for all your needs. Effects processing is performed using 64-bit double
precision for the highest clarity with minimum added distortion. Most
effects use a standard layout and controls to make each effect dialog as similar
as possible, these types of effects are collectively known as general
effects.
Using the General Effects
Learning to use any effect is about practice,
a little knowledge and lots of artistic ability. In Soundprobe your
artist ability is given more freedom to create than any other sound editing
package with the flexibility and control you have over general effects. The
main feature that makes general effects special is the ability to
control virtually all of their parameters using time variations. All
general effects also support full real-time processing and frequency editing giving
your even more control.
General Effects Controls
The controls within the general effects dialogs remain
constant along the top and right sides. The centre controls change depending on
the effect but remain very similar. Each effect parameter that can use time
variations has a slider control, an edit box, a variations check box and
variations button. Each FFT based effect has a
additional Accuracy control drop-down list and Options button.
|
Presets for each effect can be created and selected which
keep all the parameter settings you have made to enable you to keep a
library of the most useful parameters for you. |
|
Each general effect enables you to preview how the effect
sounds. You can manually change the parameters during preview, select a
preset and create new time variations, each change can be heard as you
make it. |
|
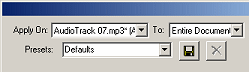
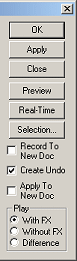
Common Controls
The common controls along the top and right side give you a familiar
layout for each general effect dialog. Along the top of the dialogs are
controls to open and save effect presets, change the document and section to
which the effect is applied. Down the right side are the controls for applying
the effect and using the effect in real-time.
To change the document to which the effect is applied:
- Select the Apply On drop-down list.
- Select the documents name from the list to which you want to apply the
effect.
To change the section of the sound in which the effect is applied:
- Select the To drop-down list.
- Select the section from the list.
Note: this option is only available if you
are applying to the current document, any other document will use the
entire document for the effect processing.
To open an effect preset:
- Select the Presets drop-down list.
- Select the preset name from the list to change the parameters to those
contained within the preset.
To delete an effect preset:
- Select the Presets drop-down list.
- Select the preset name from the list.
- Click the Delete icon.
To save a new effect preset:
- Click within the Presets control.
- Enter the name for the new preset.
- Click the Save icon.
To replace an existing effect preset:
- Select the Presets drop-down list.
- Select the preset name from the list.
- Set the effects parameters.
- Click the Save icon.
To apply and exit the effect:
- Click the OK button to apply the effect and close the dialog.
To apply the effect but leave the effect dialog open:
- Click the Apply button to apply the effect only.
To exit the effect:
- Click Close to close the effect dialog.
To preview the effect in real-time:
- Click the Preview button to play the sound with the effect
applied.
To use the Windows input to preview the effect in real-time:
- Click Real-Time to play the Windows input with the effect
applied.
To modify the current selection:
- Click the Selection button to open the selection edit dialog.
Note: this is only available if you are applying
the effect to the current document.
To record the real-time preview to a document:
- Enable the Record To New Doc check box, the next time you use Preview
or Real-Time the output will be recorded to a new document.
To prevent the effect creating an undo buffer:
- Disable the Create Undo check box, this will temporarily disable the undo
for the effects.
To force the effect to ignore smooth
editing:
- Hold down the SHIFT key before clicking OK or Apply, you can release it
once the effect has started to be processed.
To apply the effect using non-destructive editing method:
- Enable the Apply To New Doc option to create a duplicate of the sound
before applying the effect.
To hear the effect applied to the sound during preview or real-time:
- Select the With FX radio button to enable the effect.
To hear the original sound with the effect applied during preview:
- Select the Without FX radio button to turn off the effect.
To hear the difference between the original sound and the sound after the
effect is applied during preview:
- Select the Difference radio button to subtract the original sound from the
sound after the effect is applied.
Parameters
Most parameters in Soundprobe use the units that you
have selected in the properties. Each effect parameter which supports time
variation has the
same group of associated controls which give you access to the time variation
options. Many parameters can be varied over time, all at the same time, each
with its own options giving total control of the effect.
To change the units used for a single
parameter:
- Select the edit box for the parameter.
- Enter a value for the parameter followed by the unit
type,
for example 100 %, 0 dB, 1000 Hz, 1
kHz.
Note: if you enter a value without any units, the
previously used units are assumed. To be able to manually set the units you must
have the global unit type set to Last Used.
To change the global units used throughout
Soundprobe:
- Select Tools > Properties.
- Click the Display tab.
- Select the Parameter Units drop-down list and select the unit
type.
To change a parameter using the mouse:
- Set the parameter slider.
- Move the slider, or use the arrows keys to move the slider.
To type the value of a parameter:
- Click in the parameters edit box.
- Enter the value.
To enable time variation:
- Enable the parameters Variable check box.
To change the time variation of a parameter:
- Click the Variations button.
See Time Variations
FFT Effect Controls
Many advanced effects use an FFT for the effect processing,
which can cause distortion if the sound is suddenly changed by a large
amount. To help control the affect the FFT has on a sound, a section of advanced
controls are available to control virtually every aspect of an FFT
effect.
Accuracy
The accuracy of an FFT effect is based on a balance
between the frequency resolution and the time resolution. The higher the
frequency resolution, the lower the
time resolution and vice versa, this balance is known as the uncertainty
principle.
With some effects this balance doesn't have much of an affect, such as standard
frequency band filtering, but on some FFT effects it can improve the quality of
the result dramatically but is dependant on the sound being processed and the
required result so must be set manually.
Another side to the FFT is the speed that it takes to process the effect. A
high frequency resolution takes longer to process and can make a big difference
when using real-time processing. If you find your system is not fast enough to
process an FFT based effect, you can try decreasing the frequency resolution, or
turning off some of the advanced options.
There are some preset accuracy settings available which give some
compromises for speed. If you need high quality processing, then it is
advisable to use the advanced options and set the frequency resolution manually
depending on the sound being processing and the parameters being applied.
To select an accuracy preset:
- Select the Accuracy drop-down list.
- Select the preset from the list.
To use the advanced FFT options:
- Select the Accuracy drop-down list.
- Select Advanced from the list.
- Click the Advanced button to display the advanced FFT options
dialog.
Advanced Options
The advanced FFT options give you total control over how the FFT effect is
applied to the sound.
To set the FFT resolution:
- Set the Resolution slider.
To change the time overlap of the FFT frames:
Note: it is advised to use an overlap to smooth
changes between each FFT frame.
Limiting the Frequency Changes
You can restrict the frequencies which are affected, how much they are
affected, how quickly the sound is allowed to be change and even which
intensities are allowed to be changed by the effect.
To limit the intensities affected:
- Enable the Limit Intensities Affected check box.
- Select the Limit Type drop-down list.
- Select the type of intensity to limit.
- Set the Low Intensity or High Intensity slider.
To limit the frequencies affected:
- Enable the Limit Affected Frequencies check box.
- Select the Frequency Limit button to show the FFT Filtering
dialog.
- Create a frequency limit profile of how much each frequency is allowed to
be affected; 0 % stops the effect having any affect on that frequencies.
- Click OK to set the profile and close the dialog.
To limit the change between each frequency:
- Enable the Limit Frequency Changes check box.
- Set the Max Change slider to the maximum amount each frequencies intensity
is allowed to change by from the frequency band below it.
To limit the change over time:
- Enable the Limit Filter Changes check box.
- Set the Attack slider to the time it will take to filter any frequency
component.
- Set the Release slider to the time it will take to boost any frequency
component.
Controlling Effects Over Time
Soundprobe has the powerful option to change a
parameters value over time. Through time variations you can
create fantastic new effects, control precisely how an effect is applied to a
sound at every point in time, or just make the effect sound totally weird!
Time variations puts the control in your hands and gives you a flexible and
powerful system for applying effects.
Time Variations
The variations dialog gives you many ways to control how a parameters value
changes over time. You can create automatic sweeps from one value to another or
complex envelopes which control the value at every point in time.
To sweep a parameter from a start value to another over the section the
effect is applied:
- Select the Type drop-down list.
- Select Linear from the list.
- Set the Start and End sliders.
To sweep a parameter between two values:
- Select the Type drop-down list.
- Select one of the follow from the list: Cyclic, Triangular, Square or
Sine.
- Select the Period drop-down list.
- Select how the type of period you want to set for the sweep to repeat.
- Set the period over which to sweep the parameter.
To use another sound to vary a parameter:
- Select the Type drop-down list.
- Select From Sound from the list.
- Select the Document drop-down list.
- Select the document that has the sound you want to use.
Note: this variation maps the min and max value
sliders to the sound such the sample values in the sound range from min to
max.
To use an envelope to vary a parameter:
- Select the Type drop-down list.
- Select Vector from the list.
- Click the Vector Envelope button to
open the vector envelope dialog.
See Vector Envelope Variations .
To offset a parameters starting value:
- Click in the Offset edit box.
- Enter the time through the variation period to offset the parameters
by.
Hint: by using the same variation with two
parameters you can introduce a phase difference between the two parameters by
offsetting one of them.
Vector Envelope Variations
By creating a simple envelope
Soundprobe can interpolate the value of a
parameter between each point in the envelope, controlling the parameters value
at every point in time.

The vector envelope can be used to create fantastic
sweeping effects, or to control the exact sound and application of an
effect.
To add a new handle to the envelope:
- Click within the envelope graph area to add a new handle at the mouse
position.
To select a handle:
- Move the mouse cursor over one of the handles on the envelope, the cursor
will change to arrows showing you can select the handle.
- Click to select the handle, it will change colour when selected.
To move a handle:
- Move the mouse cursor over one of the handles on the envelope, the cursor
will change to arrows showing you can move the handle.
- Click and drag the handle to the new position.
To remove a handle:
- Select the handle you want to remove.
- Click Remove or press the delete key.
To reset the envelope to a static value:
To mirror the envelope:
To manually set the coordinates of a handle:
- Select then handle your want to change.
- Click in the X coordinate edit box and enter the value.
- Click in the Y coordinate edit box and enter the value.
Note: the first and last handles have fixed
positions, only the Y coordinate can be changed for them
To create an envelope from a preset:
- Select the Predefined Vectors drop-down list.
- Select a preset envelope from the list.
To map the envelope to the entire sound:
- Select the Entire Document radio button.
Note: when using this mapping type, the variation
is mapped to the whole document with the start of the variation corresponding to
the start of the document and the end to the end of the document, where you
apply the effect to within the document will offset the variation
correspondingly.
To map the envelope to the application section of the sound:
- Select the Apply Time radio button.
To map the envelope to a set time:
- Select the Time radio button.
- Enter the time into the edit box.
To resize the vector envelope dialog:
- Move the mouse cursor to any edge of the vector envelope dialog, the
cursor will change to a resizing cursor.
- Click and drag the edge to resize the dialog.
Real-Time Processing
When applying effects Soundprobe has the ability to hear the effects in real-time giving you the power to fine
tune your effect parameters.
Previewing Your Effect
You can preview the effects before applying them to your sounds. As you hear
the sound played back with the effect you can change the
parameters and hear the changes as you make them. This saves lots of time,
especially on complex effect which may take several minutes to apply to large
files.
To preview an effect:
- Open the effects dialog.
- Click the Preview button.
Real-Time Effect Processing
Soundprobe can be used as a powerful real-time effects
box. You can control the effect in real-time, and even used time variations to setup
automatic effect changes.
To use the Windows input to preview the effect:
- Open the effects dialog.
- Click the Real-Time button.
Recording Your Effect in Real-Time
With some effects you may prefer to make the time variation changes yourself,
or to fine tune the effect as the sound changes. By recording the output to a
new document you can vary the parameters
and record the changes as you make them.
To record real-time and preview:
- Open the effects dialog.
- Enable the Record To New Doc check box.
- Click either Preview or Real-Time to begin recording.
Hearing the Difference
With subtle effects it can sometimes be hard to decide if the change is
enough, by switch back and forth between the sound with and with out the effect
applied you can quickly pick up the subtle changes.
To hear the original sound:
- Select the Without FX radio button.
To hear the sound with effect:
- Select the With FX radio button.
To hear the difference between the original sound and the sound after
processing with the effect:
- Select the Difference radio button.
Effect Presets
Soundprobe enables you save out the parameter settings for the effects,
giving you quick access to the commonly used settings and enabling you to create
and share new effects. Soundprobe has an additional application for managing
your preset collection so that you can build a library of unique effects.
To select a preset:
- Select the Presets drop-down list.
- Select the preset name from the list.
To use the keyboard to quickly select a preset:
- Press F2 to F12 to select the presets in the list from F2 as the first to
the 11th preset if one is available.
See Common Controls.
Managing Presets
To open the preset manager:
Note: if this menu options is not available the
external application is either not present, or not within the Soundprobe
folder.
To backup a preset to a file:
-
Open the Preset Manager.
-
Select the effect from the effect list (on the left).
-
Select the preset to backup from the preset list (on the right).
-
Click Save To.
-
Select the folder to save the preset to.
-
Click OK.
Note: if an effect does not appear in the effects
list, no presets have been saved for that effect.
To save all presets to a file:
-
Open the Preset Manager.
-
Click Backup All.
-
Select the folder to save all the preset files to.
-
Click OK.
To reload a preset from a file:
-
Open the Preset Manager.
-
Click Load.
-
Select the preset file to reload.
-
Click OK.
See Also: